12 map과컴포넌트
1. 영상보기
2. 비슷한 컴포넌트 여러 개 만들기
우리는 앞에서 컴포넌트를 많이 만들 때 <Fruit /> <Fruit /> <Fruit /> ... 와 같이 컴포넌트를 직접 입력했다.
이게 최선의 방법일까?
어떻게 하면 컴포넌트를 효율적으로 제작할 수 있는지 알아보자.
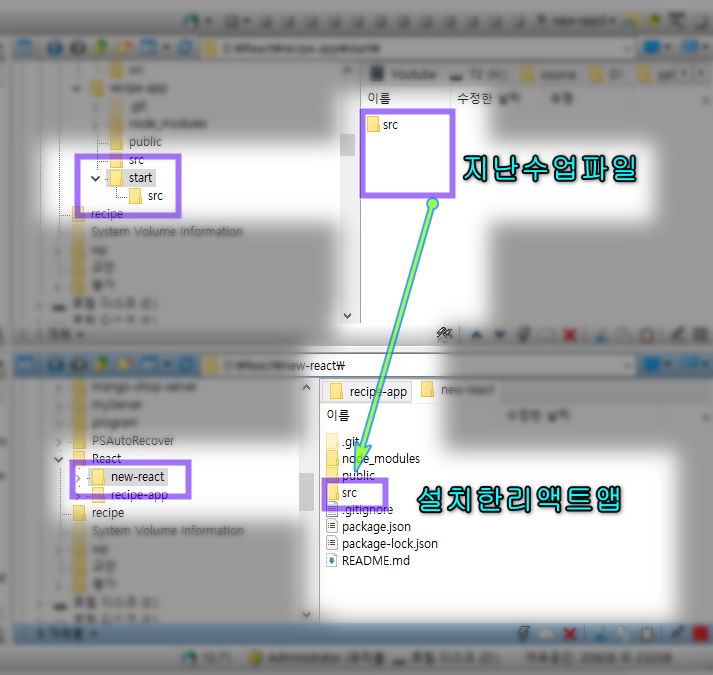
#1.1. 시작파일 내려받기
만약 전시간 파일이 없을 경우 아래의 파일을 다운로드 하여 진행한다
시작 파일 파일활용방법
#1.2. 앞에서 만든 컴포넌트 형태 다시 살펴보기
- 우리가 마지막으로 작성한 App.js 파일을 다시 열어 코드가 효율적인지 살펴보자.
1import React from 'react';2
3function Fruit({ fav }) {4  return <h1>내가 좋아하는{fav}</h1>;5}6
7function App() {8  return (9    <div>10      <h1>Hello</h1>11      <Fruit fav='바나나' />12      <Fruit fav='오렌지' />13      <Fruit fav='사과' />14      <Fruit fav='메론' />15    </div>);16}17
18export default App;
1 2 3 4 5 6 7 8 9 10 11 12 13 14 15 16 17 18 19
- 이 코드는 효율적이지 않다. 왜냐하면 새 과일을 추가할 때마다 를 복사해야 하기 때문이다.만약 과일이 1000개라면 1000개를 반복해서 작성해야 하고, 그때마다 fav props에 다른 값을 입력해야 한다.
- 또 서버에서 과일 데이터를 받아 출력하는 경우, 과일 데이터의 개수를 알 수 없다면 이 방법은 문제가 될 것이다.그때그때 서버에서 넘어오는 데이터 개수만큼 컴포넌트를 작성할 수 없기 때문에…
- 지금부터 이 문제를 해결하는 방법을 알아 보자.다만! 우리는 아직 서버에서 데이터를 받아오는 방법을 모르니까 일단 서버에서 데이터를 받았다고 가정하고, 그 데이터를 출력하는 방법을 알아보자. #1.3. 과일 데이터 만들기1
- 서버에서 넘어온 데이터를 저장할 수 있도록 fruitIDB라는 변수를 만든 다음 빈 배열을 할당하자.그리고 아쉽지만 App 컴포넌트 안에 한 땀 한 땀 입력했던 Fruit 컴포넌트는 모두 삭제하자.
1import React from 'react';2
3function Fruit({ fav }) {4  return <h1>내가 좋아하는 {fav}</h1>;5}6
7const fruitDB = []; // fruitDB 변수에 빈 배열을 저장해!8
9function App() {10  return (11    <div>12      <h1>Hello</h1>13    </div>);14}15
16export default App;
1 2 3 4 5 6 7 8 9 10 11 12 13 14 15 16 17 #1.4. 과일 데이터 만들기2
- image 키의 값은 아래 주소를 복붙한다.
1'http://qwerew.cafe24.com/images/banana.png';2'http://qwerew.cafe24.com/images/orange.png';3'http://qwerew.cafe24.com/images/apple.png';4'http://qwerew.cafe24.com/images/melon.jpg';1 2 3 4
- 아래는 fruitDB 의 완성된 데이터구조 이다.오타가 났을 경우 복사하여 사용한다.
1const fruitDB = [2  { name: 'banana', image: 'http://qwerew.cafe24.com/images/banana.png' },3  { name: 'orange' image: 'http://qwerew.cafe24.com/images/orange.png' },4  { name: 'apple', image: 'http://qwerew.cafe24.com/images/apple.png' },5  { name: 'melon', image: 'http://qwerew.cafe24.com/images/melon.jpg' },6];7
8...9export default App;
1 2 3 4 5 6 7 8 9
#2. map() 함수로 컴포넌트 많이 만들기
- fruitIDB에 있는 데이터로 컴포넌트를 여러 개 만들려면 자바스크립트 함수 map()의 사용 방법을 알아야 한다. #2.1. map() 함수 사용법 알아보기1 🔗mdn
- map 메소드: 배열이 갖고있는 함수. 콜백함수에서 리턴된 값을 기반으로 새 배열 생성함
1/*기존의 배열요소를 기반으로 새로운 배열요소를 만들어 리턴*/2<script>3  let cats = ['땅콩', '얼룩', '회색'];4  let call = cats.map(function (value, index, array) {5    //return value, index, array;6    return value + '밥먹자!!';7  });8  //땅콩밥먹자,얼룩밥먹자,회색밥먹자 출력됨9  //매개변수 value를 추가하여 새 배열로 생성함10
11  document.write(call);12</script>13
14-------------------------------------------------------------------------------------15
16<script>17  // 배열을 선언.18  let numbers = [273, 52, 103, 32, 57];19
20  // 배열의 모든 값을 두배로.21  let doubles = numbers.map(function (value) {22    return value * 2;23  });24
25  // 출력.26  console.log(doubles);27
28</script>#2.2. map() 함수 사용법 알아보기2 지시문 정답 map 함수를 사용하여 아래와 같은 결과를 출력하시오

시작코드
const frends = ['철수', '영희','복순','민호'];#2.3. map() 함수로 Fruit 컴포넌트를 많이 만들어 보기1
- 자 이제 크롬 브라우저에서 벗어나 VSCode 화면으로 돌아가서 ./src/App.js를 보자.그리고 fruitIDB 배열을 다시 한번 눈으로 확인하면서 map 함수를 어떻게 적용할지 설계해 보자.
(생략...)const fruitDB = [ { name : 'banana', image: 'http://qwerew.cafe24.com/images/banana.png', }, { name : 'orange', image: 'http://qwerew.cafe24.com/images/orange.png', },(생략...)- fruitDB.map(…)과 같이 작성하고, map() 함수에 전달할 인자에는 value =>
<Fruit .../>와 같이 컴포넌트를 반환하는 함수를 전달하면 될 것이다.value에는 배열에 있는 원소, 즉 객체 [name: ’…’, image: ’…’]이 하나씩 넘어올 것이다.이걸 value.name, value.image와 같은 방법으로 컴포넌트에 전달하면 된다.이제 천천히 코딩해 보자. #2.4. map() 함수로 Fruit 컴포넌트를 많이 만들어 보기2 - map() 함수를 fruitDB배열에 적용하여 코드를 작성해 보자.
<h1> Hello </h1>은 삭제하고,[fruitDB.map(...)]을 추가하면 된다.
- 그리고 fruit 컴포넌트에서 받은 인자를 로 수정한다.
1const fruitDB = [2  { name: 'banana', image: 'http://qwerew.cafe24.com/images/banana.png' },3  { name: 'orange' image: 'http://qwerew.cafe24.com/images/orange.png' },4  { name: 'apple', image: 'http://qwerew.cafe24.com/images/apple.png' },5  { name: 'melon', image: 'http://qwerew.cafe24.com/images/melon.jpg' },6];7
8const Fruit = (props) => {9  //const fav = props.fav;10  console.log(props);11  const { name, img } = props;12  return <h3>내가 좋아하는 {name}</h3>;13};14
15function App() {16  return (17    <div className='App'>18      {fruitDB.map((o, i) => {19        // console.log(o);20        // console.log(i);21        return <Fruit key={i} name={o.name} img={o.image} />;22      })}23    </div>);24}25
26export default App;
1 2 3 4 5 6 7 8 9 10 11 12 13 14 15 16 17 18 19 20 21 22 23 24 25 26 27

#2.5. Fruit 컴포넌트에 과일 이미지 출력하기1
1const Fruit = (props) => {2 //const fav = props.fav;3 console.log(props);4 const { name, img } = props;5 return (6 <div>7 <h3>내가 좋아하는 {name}</h3>8 <img src={img} alt={name} />9 </div>);10};1 2 3 4 5 6 7 8 9 10 11
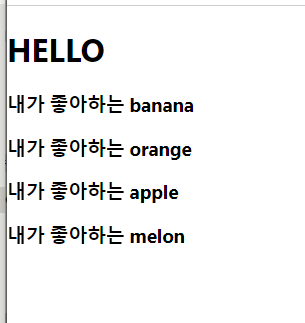
- 이제 과일의 이름과 이미지가 모두 나타난다. 이렇게 map() 함수를 사용하면 배열에 데이터가 몇 개 있던지 컴포넌트를 쉽게 출력할 수 있다.

#2.6. 추가설명 React에서 map을 사용하다보면 console에서 다음과 같은 경고 메시지 해결방법
> Warning: Each child in a list should have a unique "key" prop.- list 내의 각 child에는 고유한 “key”prop이 있어야한다. 즉, 모든 react의 element들은 유일해야하고, element들을 list 안에 넣을 때, 그 고유성을 잃어버린다. for some reason
- 우리가 해야할 일은, list에 id를 추가하는 것이다. 즉, react의 모든 element들은 다르게 보일 필요가 있다.
1const fruitDB = [2 { id: 1, name: 'banana', image: 'http://qwerew.cafe24.com/images/banana.png' },3 { id: 2, name: 'orange' image: 'http://qwerew.cafe24.com/images/orange.png' },4 { id: 3, name: 'apple', image: 'http://qwerew.cafe24.com/images/apple.png' },5 { id: 4, name: 'melon', image: 'http://qwerew.cafe24.com/images/melon.jpg' },6];1 2 3 4 5 6
- 그리고 컴포넌트에 prop을 준다. 그 prop은 바로 “key”이다.
- 그리고 나면 아래와 같이 key prop을 추가하면 바로 경고 문구가 사라진 것을 볼 수 있다.
1/* import 오렌지 from './오렌지'; */2const fruitDB = [3  { id: 1, name: 'banana', image: 'http://qwerew.cafe24.com/images/banana.png' },4  { id: 2, name: 'orange' image: 'http://qwerew.cafe24.com/images/orange.png' },5  { id: 3, name: 'apple', image: 'http://qwerew.cafe24.com/images/apple.png' },6  { id: 4,  name: 'melon', image: 'http://qwerew.cafe24.com/images/melon.jpg' },7];8
9const Fruit = (props) => {10  //const fav = props.fav;11  console.log(props);12  const { name, img } = props;13  return (14    <div>15      <h3>내가 좋아하는 {name}</h3>16      <img src={img} alt={name} />17    </div>);18};19
20function App() {21  return (22    <div className='App'>23      <h1>HELLO</h1>24      {fruitDB.map((o, i) => {25        // console.log(o);26        // console.log(i);27        return <Fruit key={i} name={o.name} img={o.image} />;28      })}29    </div>);30}31
32export default App;
1 2 3 4 5 6 7 8 9 10 11 12 13 14 15 16 17 18 19 20 21 22 23 24 25 26 27 28 29 30 31 32 33 34
#3. 과일 앱 이리저리 만지고, 고쳐보기
- 04-2에서 만든 과일 앱을 이리저리 만져 보면서 리액트와 map() 함수가 어떤 상호 작용을 하는지 조금만 더 자세히 알아보자. 우선 map() 함수와 인자로 함수를 전달하도록 만들어 보자. #3.1. map() 함수의 인자로 함수 전달하기
- {fruitIDB.map(dish => ( ))}를 {fruitIDB.map( renderFruit )}로 변경하자.
1...2{fruitDB.map(renderFruit)}3...1 2 3
- 현재 상태에서는 Error로 실행되지 않는다. #3.2. renderFruit() 함수 정의하기
- 그런 다음 renderFruit() 함수를 정의하자
1/* import 오렌지 from './오렌지'; */2const fruitDB = [3  { id: 1, name: 'banana', image: 'http://qwerew.cafe24.com/images/banana.png' },4  { id: 2, name: 'orange' image: 'http://qwerew.cafe24.com/images/orange.png' },5  { id: 3, name: 'apple', image: 'http://qwerew.cafe24.com/images/apple.png' },6  { id: 4,  name: 'melon', image: 'http://qwerew.cafe24.com/images/melon.jpg' },7];8
9const Fruit = (props) => {10  const { name, img } = props;11  return (12    <div>13      <h3>내가 좋아하는 {name}</h3>14      <img src={img} alt={name} />15    </div>);16};17const renderFruit = (o, i) => {18  return <Fruit key={i} name={o.name} img={o.image} />;19};20
21function App() {22  return (23    <div className='App'>24      <h1>HELLO</h1>25      {/* {fruitDB.map((o,i) => {26        return <Fruit key={i} name={o.name} img={o.image} />;27      })} */}28      {fruitDB.map(renderFruit)}29    </div>);30}31
32export default App;
1 2 3 4 5 6 7 8 9 10 11 12 13 14 15 16 17 18 19 20 21 22 23 24 25 26 27 28 29 30 31 32 33 34
- map() 함수의 첫 번째 인자로 전달한 화살표 함수를 밖으로 빼서 일반 함수 renderFruit()로 작성했을 뿐, 과일 앱의 기능이 달라진 건 아니다. 코드를 저장하고 앱을 실행해 보면 결과 화면은 같다.
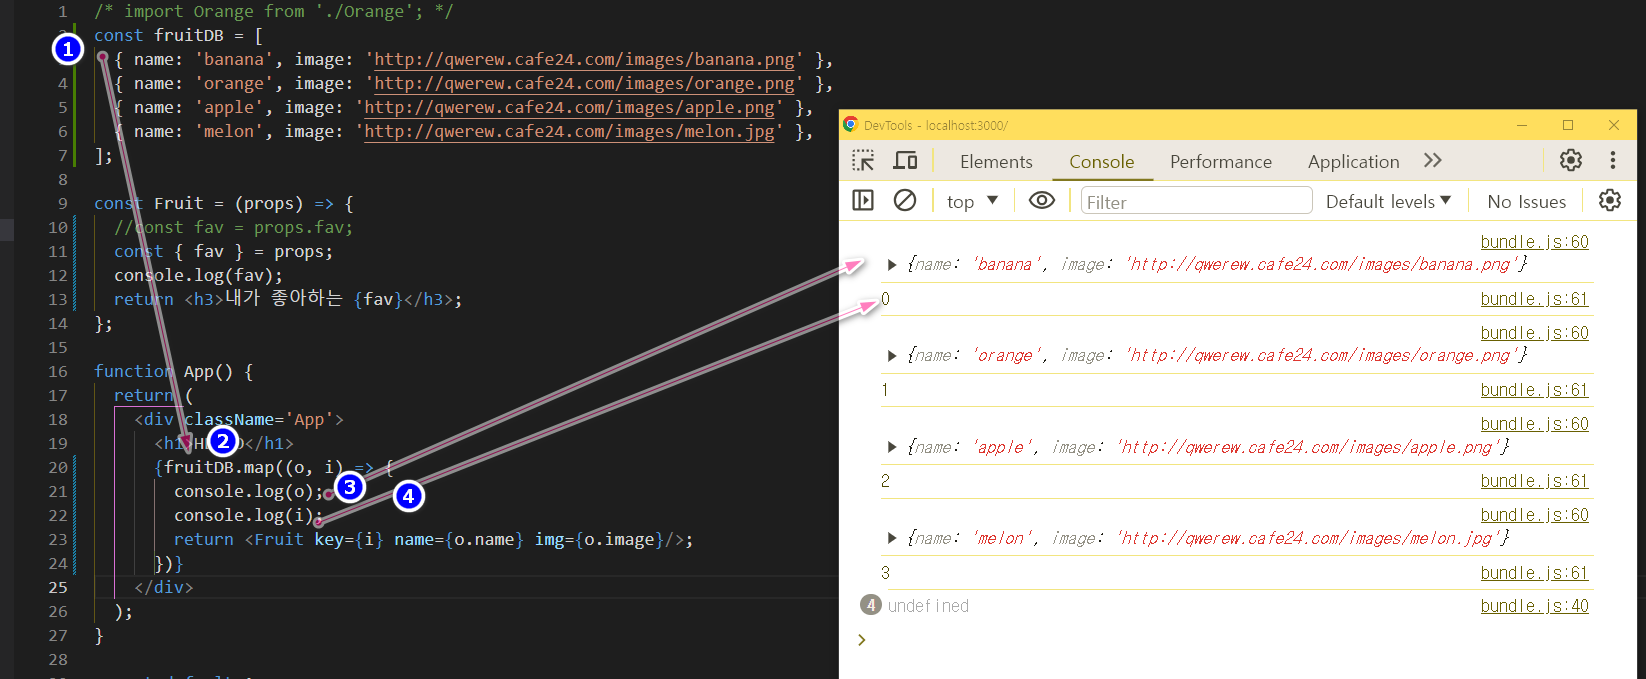
- 이제 map() 함수의 1번째 인자로 전달할 renderFruit() 함수를 분리했다. 그러면 계속해서 map() 함수가 반환하는 값이 구체적으로 무엇인지 자세히 살펴보자. #3.3. map() 함수의 반환값 살펴보기
- 다음과 같이 코드를 수정해서 map() 함수의 반환값을 그대로 출력해 보자. 그리고 출력한 값을 자세히 보자.
1...2function App() {3 console.log(fruitDB.map(renderFruit));4 return (5...1 2 3 4 5
- [Console] 탭을 보면 Array(4)가 보일 것이다. ▶를 눌러서 펼쳐보면 뭔가 이상한 배열이 출력되고 있다. 이게 바로 map() 함수가 반환한 리액트 컴포넌트이다. 좀 복잡한 구조임을 알 수 있다. 리액트 컴포넌트가 어떤 구조인지 보고 싶으면 또 다시 ▶를 눌러 펼쳐서 구경하면 된다.

#3.4. 과일 앱 다시 원래대로 돌려놓기
- renderFruit() 함수는 map() 함수가 반환한 리액트 컴포넌트를 출력하려고 사용해 본 것이므로 다시 원래대로 코드를 돌려놓자.
1const fruitDB = [2  { id: 1, name: 'banana', image: 'http://qwerew.cafe24.com/images/banana.png' },3  { id: 2, name: 'orange' image: 'http://qwerew.cafe24.com/images/orange.png' },4  { id: 3, name: 'apple', image: 'http://qwerew.cafe24.com/images/apple.png' },5  { id: 4,  name: 'melon', image: 'http://qwerew.cafe24.com/images/melon.jpg' },6];7
8const Fruit = (props) => {9  //const fav = props.fav;10  //console.log(props);11  const { name, img } = props;12  return (13    <div>14      <h3>내가 좋아하는 {name}</h3>15      <img src={img} alt={name} />16    </div>);17};18const renderFruit = (o, i) => {19  return <Fruit key={i} name={o.name} img={o.image} />;20};21
22function App() {23  console.log(fruitDB.map(renderFruit));24  return (25    <div className='App'>26      <h1>HELLO</h1>27      {fruitDB.map((o, i) => {28        return <Fruit key={i} name={o.name} img={o.image} />;29      })}30      {/* {fruitDB.map(renderFruit)} */}31    </div>);32}33
34export default App;
1 2 3 4 5 6 7 8 9 10 11 12 13 14 15 16 17 18 19 20 21 22 23 24 25 26 27 28 29 30 31 32 33 34 35 36
- 이렇게 하는 이유는 App.js 안에 또 다른 함수를 만들지 않기 위해서이다. 함수가 많아지면 나중에 관리하기 어려워질 수 있다.
#4. 여기까지 깃허브에 올리기
git add .git commit -m "04 깃허브에 리액트 앱 업로드하기"git push origin main